Really excited for this next week since I am back home in SoCal for the summer and my mother will be starting her summer vacation at the end of tomorrow. This means that I will have someone who is willing to come with me on adventures with me and we can go climb in the riverside quary like we did last summer.
Also my Mac should be finished being repaired on Monday or Tuesday. Which means I can upload photos from my climb in the Black Hills.
I am also excited for getting to share another knot with you tomorrow. I'll give you a hint...
"Going up"
As always, Keep climbing!
Thursday, June 12, 2014

Friday, June 6, 2014
Friday Knot for Thought 6-6-14
So I thought that it would be good to post the basic knot that everyone knows with some variations of it that are useful when climbing.

The Followthrough Figure Eight
Followthrough Figure eight and some more knots
On a Bite

(The link above)
I used to use this knot when I would rappel out of the tree in my front yard after setting up an anchor. The nice thing about this knot is that you can put it anywhere you can double up the rope.
Followthrough Figure 8 on a bite with 2 Ears
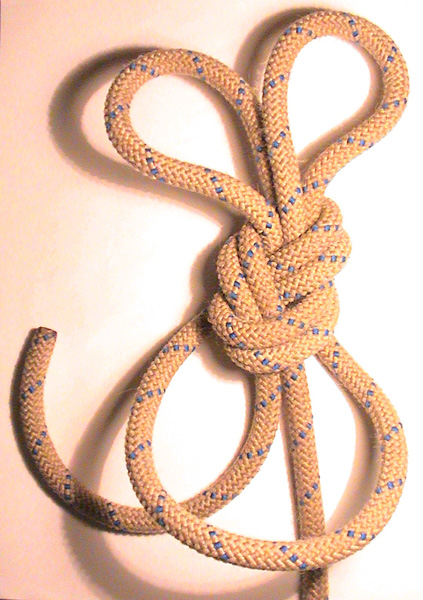
The double figure eight, also known as the "Bunny Ears", is handy when equalising two anchors using the rope. Many top ropers are fond of this knot. The "ears" can be elongated or shrunk with a little adjustment making equalisation of the load fairly simple. Follow these steps to tie the double figure eight:


 Step 1: Start with a figure eight on a bite in the end of the rope. Use a generous bite, way more than pictured, leaving a large loop sticking out the top. Step2: Feed this large loop back into the figure eight.Steps 3, 4 & 5: Continue feeding the large loop through. Not too much though, so as to leave the twin "ears" behind. Now tuck the large loop upwards, under the knot and finally over and around the twin "ears".


 Steps 6 & 7: Pull the "ears" tight, and clip each on to your anchors. You can now adjust the tension, equalising the anchors by elongating one ear, and thus shrinking the other ear.

(From chockstone.org)
The Followthrough Figure Eight
Followthrough Figure eight and some more knots

On a Bite
(The link above)
I used to use this knot when I would rappel out of the tree in my front yard after setting up an anchor. The nice thing about this knot is that you can put it anywhere you can double up the rope.
Followthrough Figure 8 on a bite with 2 Ears
The double figure eight, also known as the "Bunny Ears", is handy when equalising two anchors using the rope. Many top ropers are fond of this knot. The "ears" can be elongated or shrunk with a little adjustment making equalisation of the load fairly simple. Follow these steps to tie the double figure eight:
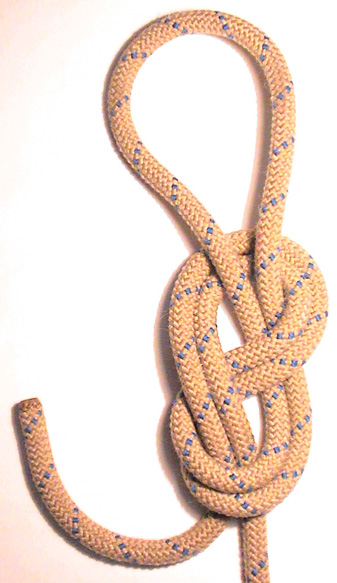
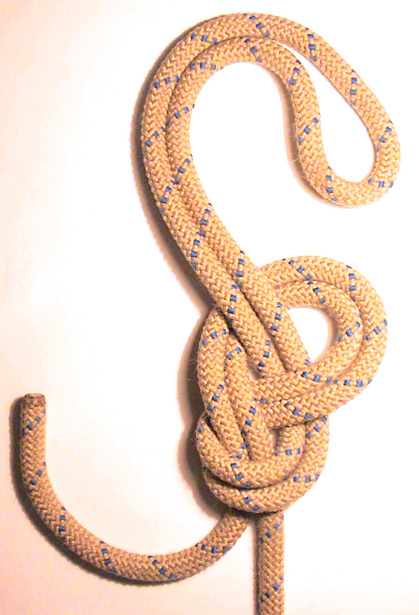
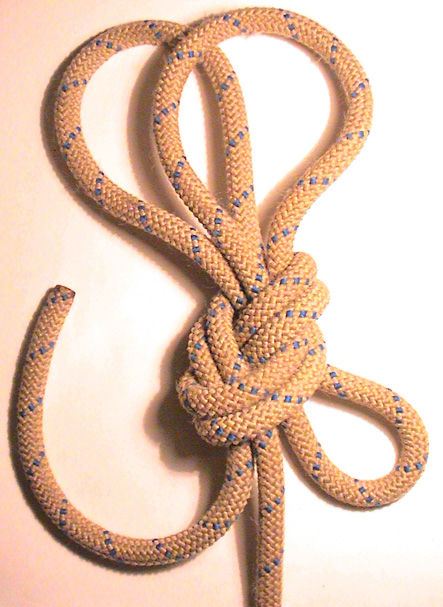 Step 1: Start with a figure eight on a bite in the end of the rope. Use a generous bite, way more than pictured, leaving a large loop sticking out the top. Step2: Feed this large loop back into the figure eight.Steps 3, 4 & 5: Continue feeding the large loop through. Not too much though, so as to leave the twin "ears" behind. Now tuck the large loop upwards, under the knot and finally over and around the twin "ears".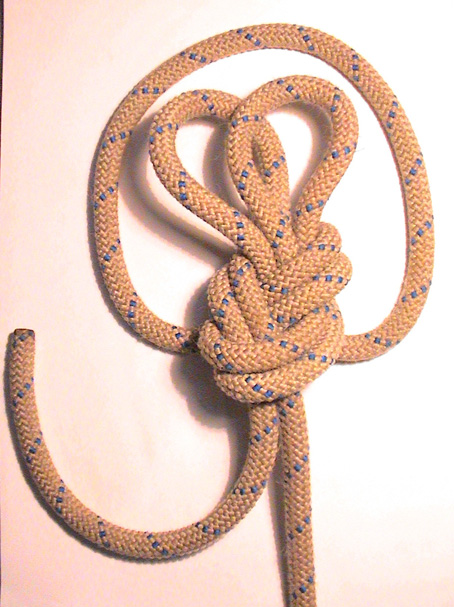
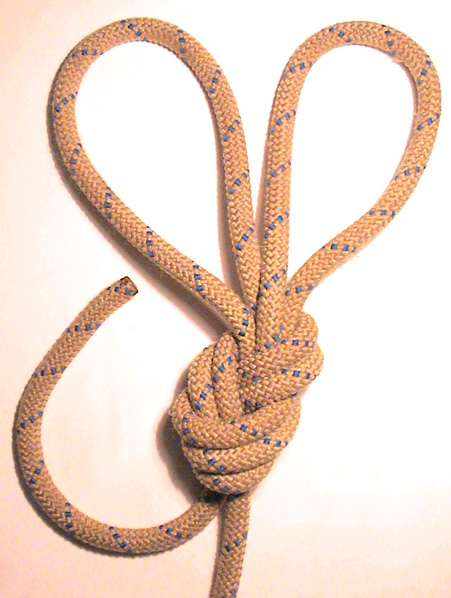 Steps 6 & 7: Pull the "ears" tight, and clip each on to your anchors. You can now adjust the tension, equalising the anchors by elongating one ear, and thus shrinking the other ear.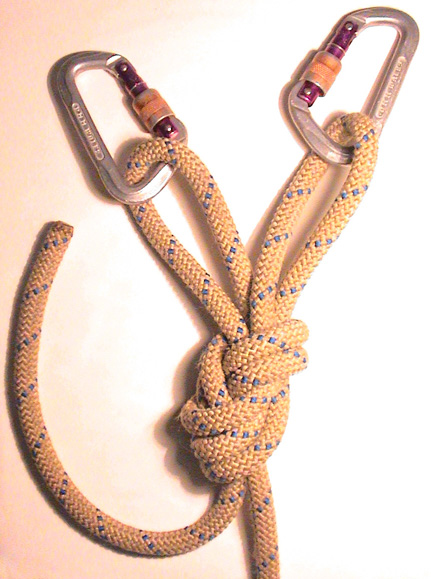
(From chockstone.org)
Summer 2014
I'm finally home after 2182 miles of driving, three nights of camping, sleeping at rest stops in the back of my car and a great week with my wonderful grandparents in Sacramento. And of course some great climbing adventures.
I started this trip in Vermillion, SD where school is done for the 2013-14 year and will pick up again in the fall. So I thought to myself, "It would be nice to climb behind Mt. Rushmore again." So that went on my list of destinations. Next I knew that it would be a treat to go by my grandparents house in Sacramento, CA so that went on the list. The nice thing was that I have a guide book for Southern Lake Tahoe. So I could stop by there and climb on my way.
So I started my trip and went to the Black Hills in South Dakota on the eastern side of the state. I stopped at Wrinkled Rock Climbing campground since I could camp there for free. Since it was memorial day weekend there were a couple of groups of climbers there and I made friends with a large group of 10 climbers from Minnesota who were on a annual climbing trip.
The next day we woke up with the sun because the forecast called for rain in the afternoon. We decided to go to Custer State Park and climb the Cathedral Spires. After getting a pass at the main lodge we went a couple miles into the park past Sylvan Lake and parked in a small parking lot at the start of the approach.
It wasn't too much of a hike in and the scenery was great. We finished our approach when we got to this spot between Spire 2 and Spire 3 and 4.
There were four of us including myself that went to climb Spire 2's Jan/Jane route. Being the first time doing a multi pitch route and trad climbing I was a bit nervous but had more excitement than anything else. My climbing partner Dave Sandel, from Colorado, led the way on the route on the left of the arête. Later I found out that dave free climbed the first pitch because he couldn't find anywhere to place pro. But after that he continued to the second anchor and placed some gear.
I started quickly up the route which is rated around 5.7. Not difficult by any means so it was just fun and enjoyable. For being a 250 ft route it didn't feel like you were that high because the exposer was very minimal.
When our second group summited, we did a two rope rappel after signing the register. We planned on doing Spire 4 but a line had formed with other climbers on route and by the time we were going to make an ascent a storm rolled in so we had to leave.
Being at the summit of spire 2 was wonderful and I will post the pictures that I took when I get my laptop back from being repaired at Apple.
But in the mean time I will be posting from my tablet. And if you are out in the black hills, a great day of climbing can be found at the Cathedral Spires.
I started this trip in Vermillion, SD where school is done for the 2013-14 year and will pick up again in the fall. So I thought to myself, "It would be nice to climb behind Mt. Rushmore again." So that went on my list of destinations. Next I knew that it would be a treat to go by my grandparents house in Sacramento, CA so that went on the list. The nice thing was that I have a guide book for Southern Lake Tahoe. So I could stop by there and climb on my way.
So I started my trip and went to the Black Hills in South Dakota on the eastern side of the state. I stopped at Wrinkled Rock Climbing campground since I could camp there for free. Since it was memorial day weekend there were a couple of groups of climbers there and I made friends with a large group of 10 climbers from Minnesota who were on a annual climbing trip.
The next day we woke up with the sun because the forecast called for rain in the afternoon. We decided to go to Custer State Park and climb the Cathedral Spires. After getting a pass at the main lodge we went a couple miles into the park past Sylvan Lake and parked in a small parking lot at the start of the approach.
It wasn't too much of a hike in and the scenery was great. We finished our approach when we got to this spot between Spire 2 and Spire 3 and 4.
There were four of us including myself that went to climb Spire 2's Jan/Jane route. Being the first time doing a multi pitch route and trad climbing I was a bit nervous but had more excitement than anything else. My climbing partner Dave Sandel, from Colorado, led the way on the route on the left of the arête. Later I found out that dave free climbed the first pitch because he couldn't find anywhere to place pro. But after that he continued to the second anchor and placed some gear.
I started quickly up the route which is rated around 5.7. Not difficult by any means so it was just fun and enjoyable. For being a 250 ft route it didn't feel like you were that high because the exposer was very minimal.
When our second group summited, we did a two rope rappel after signing the register. We planned on doing Spire 4 but a line had formed with other climbers on route and by the time we were going to make an ascent a storm rolled in so we had to leave.
Being at the summit of spire 2 was wonderful and I will post the pictures that I took when I get my laptop back from being repaired at Apple.
But in the mean time I will be posting from my tablet. And if you are out in the black hills, a great day of climbing can be found at the Cathedral Spires.
Friday, May 30, 2014
Friday Knot for Thought
I want to try this out. Each week I will post a knot that every climber should know. Whether that knot is for climbing or just a must know outdoor knot. I would love to hear feedback from you about what knots you would like to know or what knots you find most useful when out climbing.
So here is one of the first knots that I learned for climbing and helps when connecting two pieces or tying off a piece of webbing.
The Water Knot
— easy, basic
 Essentially if you think of tying an overhand knot in the one piece of webbing and then take the other piece and like a follow-through figure eight you will have a water knot.
Getting the knot untied can be a challenge if it has been stressed or tightened down a lot. But taking hold of the tails of each piece of webbing and pushing up and in on both sides can release the knot.
Hope you enjoy, and keep climbing!
The Water Knot
— easy, basic
Getting the knot untied can be a challenge if it has been stressed or tightened down a lot. But taking hold of the tails of each piece of webbing and pushing up and in on both sides can release the knot.
Hope you enjoy, and keep climbing!
Tape Glove
So if you are wondering how to make a tape glove here is a link to two sites that I follow:
The One time glove design that they have here holds up very well on long climbs and I will be looking to test it more in a couple weeks when I meet up with my friend Tane to climb in Needles, CA.
The Reusable Tape Glove is one thing that I tested out at my home last summer and found that it was fairly useful and worked well.
While I was climbing the boulders at Folsom Lake I just used one layer of tape and really just laid the tape on the back of my hand so that it didn't get cut by the rock.
Hope you enjoy, and keep climbing!
The One time glove design that they have here holds up very well on long climbs and I will be looking to test it more in a couple weeks when I meet up with my friend Tane to climb in Needles, CA.
The Reusable Tape Glove is one thing that I tested out at my home last summer and found that it was fairly useful and worked well.
While I was climbing the boulders at Folsom Lake I just used one layer of tape and really just laid the tape on the back of my hand so that it didn't get cut by the rock.
Hope you enjoy, and keep climbing!
Folsom Lake Bouldering
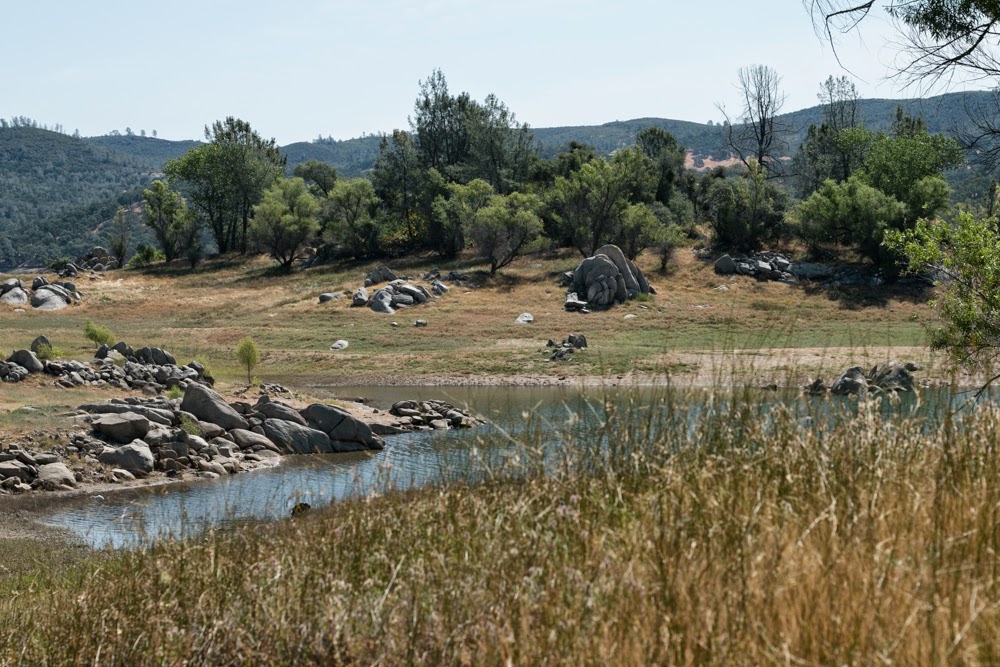 Had some fun bouldering in Folsom Lake Recreation Area, CA. I was surprised at how many boulders I actually found to climb. Overall I thought that this was a lot of fun.
Although, it is not a mecca of bouldering by any means, there were three boulders that I found to have some good crack climbing training to work finger jams and hand jams each about V2-V3; so not too difficult.
So the actual place where I went is called Beeks Bight. There is a parking lot that puts you right by the boulders. Mountain Project doesn't have to much on this place so I may have to make a map and post some more photos because I found more routes than they had.

I found that there were multiple ways to start this main problem. Each way was fairly straight forward with little power needed in order to pull yourself up off the ground.
When I exhausted the main crack I moved to using the crack on the right to tech the top. Friction was my best friend on this problem since there wasn't a lot of options for feet because the crack was quite small.
The second problem that I did on this boulder was on the left side of the face in the crack formed between the main rock and the broken off piece.
From a sit start, an un comfortable fist jam above the small overhang allows you to place your feet to grab the edge before you traverse to the top.
When you get near the top the boulder becomes a sloping side pull with sketchy tips cracks for your right hand with little feet.
I loved these routes cause they weren't too challenging but got the adrenaline pumping so I had to do each one twice.
I would strongly recommend a crash pad or two if you are going to climb here. This way you can cover up a lot of the rocks that are at the base of the problems in case of a fall.

There was a good technique work on this crack for me cause I typically climb finger size cracks and haven't had the opportunity to try various hand crack techniques outside the gym.
— Keep climbing! —
Thursday, May 29, 2014
Bouldering in Folsom
Hey I'm heading to Folsom Lake Recreation Area today because there is supposed to be some boulders there that have some fun easy climbs. This will be convenient since I am at my grandparents house visiting on my way back from school. Stay tuned for more about my bouldering adventure and climbing in the Cathedral Spires in Custer State Park.
Subscribe to:
Posts (Atom)